meta data for this page
Content Areas
—- plugin —-
description: Use any number of content areas within a campaign's message that can be edited individually.
author : Duncan Cameron
type :
lastupdate : 2015-10-02
compatible : phplist 3
depends :
conflicts :
similar :
tags :
sourcerepo : https://github.com/bramley/phplist-plugin-contentareas
donationurl:
Purpose
This plugin allows you to use any number of content areas in a campaign message, each of which can be edited individually. The approach is to add extra information, as attributes, to the template that indicate which HTML elements can be edited.
The plugin then displays the template showing the editable areas, and the contents of each area can be edited.
This approach helps you to separate the content of your newsletter from the html structure. How you actually use a content area is flexible. It can be as simple as the plain text for a <h3> heading, or it can be a complete article that includes its own HTML markup.
The plugin can also create a table of contents that links to all occurences of a specified element, e.g. lists and links to all <h3> elements.
Installation
See the README file on the GitHub page https://github.com/bramley/phplist-plugin-contentareas for how to install the plugin.
Usage
Editing a template within phplist
In its default configuration the fckeditor restricts the html elements that are allowed in a template or message. Because of that you should use either the CKEditor or the TinyMCE editor if you want to edit a template within phplist as both of those do not restrict the html elements that can be used. You will need to use the Source view in order to edit html directly.
But it may well be easier to use an external editor to create your template and then copy/paste the html into the Source view of the phplist editor.
The plugin uses the php DOM extension to parse and manipulate the template html. That processing is very strict about the validity of html, much more so than a web browser. Therefore it is important that the template html is well-formed and valid.
If the DOM extension fails when parsing a template then the plugin records the error in the phplist event log. The failure may happen at a few places:
- When composing a campaign then selecting the template. If the template fails validation then the extra 'Edit Areas' tab will not be displayed.
- When inlining CSS. In this case the plugin will continue processing but will not have inlined any CSS.
The event log record will identify the line within the template that is in error.

Identifying content areas
You define content areas by adding attributes to those HTML elements in the template that you want to be able to edit.
The plugin provides four types of content areas:
- text – a single piece of text. Use this for small areas such as headings.
- text area – a larger area of text. This can be used for simple text, or can be used to enter HTML directly.
- editor – a larger area of text that uses the phplist editor – CKEditor, TinyMCE, or FCKEditor whichever is configured.
- image – an image, either a direct link or selected through the default phplist editor.
data-edit attribute
This attribute identifies the element as one that can be edited. The value of the attribute should be a name that is unique within the template.
The attribute can be added to an element that has content, such as h2 for a single line, or div and td for larger blocks of content, or to an img element.
Do not use the data-edit attribute on a p element with a data-type attribute of “editor” (which is the default). The text that you enter into CKEditor will itself be wrapped in a p element and that will lead to invalid html. Use a div element instead.
data-type attribute
This attribute specifies how the content should be entered. For text content areas the values are:
- text - the plugin displays a text line for entering content.
- textarea - the plugin displays a text area field for entering content. The content will be treated as HTML and must be valid HTML, otherwise it will fail validation.
- editor - the plugin will use the selected editor within phplist (CKEditor, TinyMCE, or fckeditor) for entering content.
- preheader - similar to a text content area. You should include a style attribute that hides the text when the email is viewed. The plugin will remove the style attribute when editing the campaign so that it is visible and can be edited.
The plugin defaults to using editor if the attribute is not present.
For an <img> element the value is optional and is needed only when you want to restrict which attributes can be edited:
- basicimage - the plugin will allow only the src attribute of the
<img>to be edited, not any other attributes.
When an <img> element is directly included within an <a> element then the href attribute of the <a> element can be edited.
Examples of adding the attributes:
<h3 data-edit="articletitle" data-type="text">Default article title</h3>
<!-- a single line of text can be edited -->

<div data-edit="articlecontent">The default article content</div>
<!-- the default phplist editor will be used for editing -->

<div data-edit="preheader" data-type="preheader"
  style="display:none;font-size:1px;line-height:1px;max-height:0px;max-width:0px;opacity:0;overflow:hidden;mso-hide:all;font-family: sans-serif;">
(Optional) This text will appear in the inbox preview, but not the email body.
</div>
<!-- similar to a single line of text -->

<img data-edit="image_1" src="http://placehold.it/150" style="width: 150px; height: 150px;"  />
<!-- the src and style attributes can be edited -->

<img data-edit="image_2" data-type="basicimage" src="http://placehold.it/150" style="width: 150px; height: 150px;"  />
<!-- only the src attribute can be edited -->

<a href="http://test.com">
<img data-edit="imagearticle_image" src="http://placehold.it/200" style="width: 100%; max-width: 200px;" />
</a>
<!-- additionally the href attribute of the <a> element can be edited -->
Advanced attributes
Using the data-edit attribute you can identify each of a fixed number of elements as being editable.
If you need a more flexible number of articles then you can use the repeatable attribute or the hideable attribute.
data-repeatable attribute
This attribute is used to identify a chunk of HTML that includes editable content that can be used many times. When composing a message you can add further instances of the repeated chunk, and also remove instances. The content may contain data-edit attributes, but not data-repeatable nor data-hideable attributes.
The value of the attribute is a name that should be unique within the template.
The plugin will simply repeat the element with the attribute and all its child elements, so the attribute should be added only to elements that validly can be repeated in this way. If your template is table-based then it should be added to a tr element to repeat a row of a table, or added to a table element to repeat the whole table.
If the layout is div based then the attribute can be added to a div element.
This approach allows you to dynamically add further content such as articles without having to define each article individually in the template.
Here is an example that will allow a table row that includes an article title and article content to be repeated.
  <!-- start of repeating item -->
    <tr data-repeatable="article">
      <td class="border">
        <h3 data-edit="articletitle" data-type="text">Default article title</h3>
        <div data-edit="articlecontent">The default article content</div>
      </td>
    </tr>
  <!-- end of repeating item -->
A repeatable area need not have any instances, in which case it will not be included in the final email HTML. Initially a repeatable area is displayed disabled. You need to add an instance to be able to edit its content.
data-hideable attribute
The hideable attribute is used to remove a section from the final email. This allows you to have optional sections and to remove them when they are not needed in a particular campaign. The content may contain data-edit attributes, but not data-repeatable nor data-hideable attributes.
Here is an example of defining a hideable area which has one content field
<!-- start of postscript --> <tr data-hideable="postscript"> <td class="border"> <div data-edit="postscript_content"> </div> </td> </tr> <!-- end of postscript -->
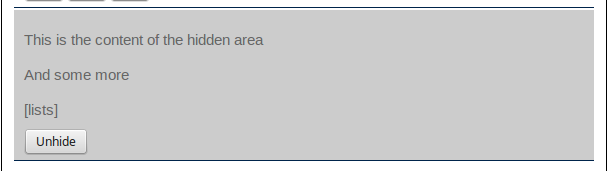
Initially, a hideable area is not hidden, and its content fields can be edited. If the area is then made hidden it is grayed-out when editing, but will be removed when the final email is built.
Table of contents
You can use the data-toc attribute to automatically create a table of contents from all occurrences of a specific element. That element should be used as the title or subtitle of each article in the newsletter.
The attribute should be added to an element that provides the heading for the table of contents. The plugin will then add links to each of the selected elements immediately after the title. In this example all <h3> elements will be included in the table of contents. Each article uses <h3> as the element for its subtitle. To simplify styling you can wrap the element in a <div> element so that css styles can be specified for it.
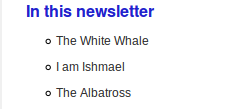
    <div class="toc">
        <div data-toc="h3">In this newsletter</div>
    </div>


    <h3 class="subtitle" data-edit="subtitle_2" data-type="text">I am Ishmael</h3>
The plugin will then generate a table of contents comprising links to each <h3> element. It will use the id attribute from an element if one exists, otherwise it will generate a unique id, for use in the link.
    <div class="toc">
        <div>In this newsletter</div>
        <p><a href="#myid">The White Whale 1</a></p>
        <p><a href="#idp281021248">I am Ishmael 1</a></p>
        <p><a href="#idp281033648">The Albatross 1</a></p>
        <p><a href="#idp281104288">I am Ishmael</a></p>
        <p><a href="#idp281115184">The Albatross</a></p>
    </div>
The toc is then styled using this css
.toc div {
    font-family: Helvetica, Arial, sans-serif;
    font-size: 16px;
    font-weight: bold;
    text-align: left;
    margin-top: 0px;
    margin-bottom: 6px;
    color: #2222CC;
}
.toc p {
    list-style:circle inside;
    display:list-item;
    padding-left: 20px;
}
.toc a {
    text-decoration:none;
    color: #333333;
}
and is then displayed
Sample template
This template shows how to use the data-repeatable, data-edit and data-hideable attributes.
Converting an existing template
You can easily convert your existing template to use a single content area for the message content.
In your template the CONTENT placeholder will probably be within an html container element, such as a div or td element.
<div>
[CONTENT]
</div>
Add a data-edit attribute to the container element and comment-out the CONTENT placeholder.
<div data-edit="content">
<!-- [CONTENT] -->
</div>
Creating a campaign
To use the template for a message, create a new message in the usual way then on the Format tab select the template. After moving onto the next tab, the plugin will have created a new tab with the title “Edit Areas”. This will usually be tab 2 but may be later depending on whether you have other plugins installed.
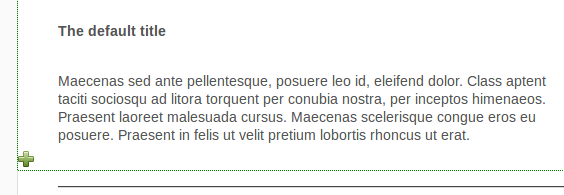
The tab displays the template with each editable content field annotated with an edit button.
Clicking the edit button for a field will pop-up an input field in which you can enter or modify the content.
Example of entering a text field as plain text.

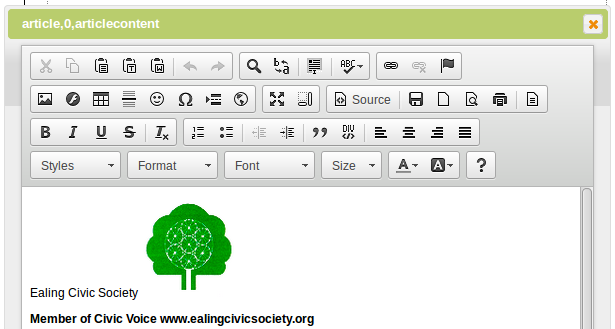
Example of entering an editor field using the selected phplist editor.
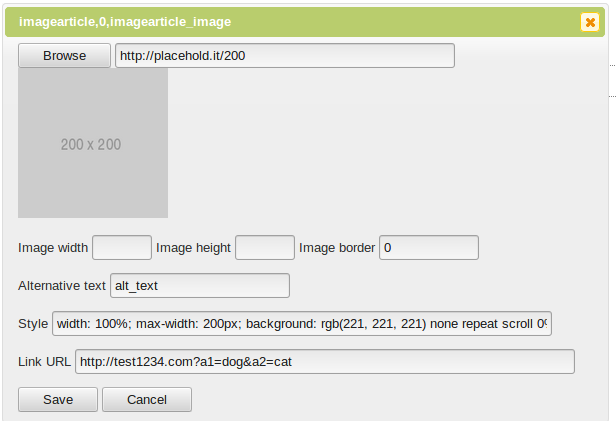
Example of entering an image field. You can enter the URL of an image directly in the text field or browse using the file manager of the selected phplist editor. Also, you can edit the width, height, alt, border and style attributes of the img element from the template.
Note that changes made here do not modify the template; they are stored within the message data and are used when the plugin creates the email by merging the template with the message data.

Example of entering an image field that is contained within an a element. You can enter the URL of the href attribute of the a element.
Example of a repeating section. Occurences can be added or removed, and re-ordered.
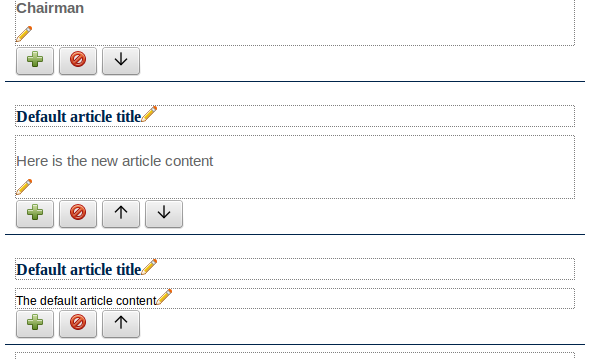
When a repeating section has no instances then it is displayed with only the add button.
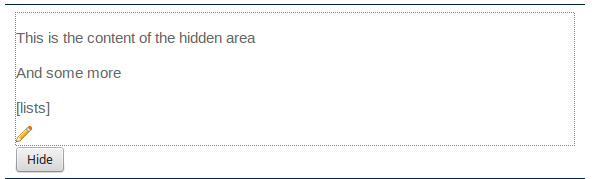
Example of a hideable section, first visible and then hidden.
Previewing a campaign
The “Edit areas” tab provides a Preview button that displays the template populated with the message content in a new tab/window.
Using the CONTENT placeholder
As the plugin does not use the CONTENT placeholder you will need to still include that in the template and also to enter something in the area on the Content tab when composing the campaign.
If you do not want to use this placeholder then the simplest approach is to include it in the template within an HTML comment
  <body>
  <!-- [CONTENT] -->
and to enter some nominal text on the Content tab, such as 'content' or even a single character. In effect the placeholder will then be ignored.
Inline CSS styles
Previous versions of the plugin provided an option to inline CSS in the body of the emails sent by phplist. This feature is now provided by Common Plugin, see https://resources.phplist.com/plugin/common
View email in browser
The plugin can be used with the View in Browser plugin to provide a link that displays the campaign in a browser. Prior to version 2.4.0 of the plugin this plugin's own placeholders had to be used: [CAVIEWBROWSER] and [CAVIEWBROWSERURL].
Those are now longer needed nor supported. You should use the placeholders provided by the View in Browser plugin
[VIEWBROWSER] and [VIEWBROWSERURL].
To avoid any problem with incompatible plugin versions you should upgrade to the latest version of this plugin and of the View in Browser plugin.
Configuration
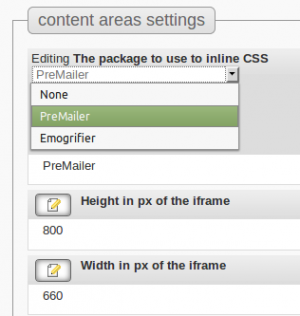
The plugin adds a Content Areas group to the Settings page where you can enter:
- The package to use to inline CSS styles - PreMailer or Emogrifier. If you have problems with either package then you can disable inlining by choosing None.
- The plugin displays the template and content in an iframe, both when editing content areas and when viewing a message. You can configure the height and width of the iframe.
Change Log
See the GitHub page https://github.com/bramley/phplist-plugin-contentareas#version-history