meta data for this page
How to Send a Campaign
Sending a campaign is the central feature within phpList. A campaign message is a single email message event sent to the members (subscribers) of one or more lists. A single message can only be sent to any subscriber once. In other words, if an administrator sends the same message to multiple lists (which share the same subscribers), each subscriber in these lists would only get that message once.
Sending a campaign can be initiated in a variety of ways. First and foremost, it can be accessed through the phpList dashboard, within the “Main” functionality section.
To begin creating a campaign from the dashboard, choose the Start or continue a campaign from the “Getting Started” section.
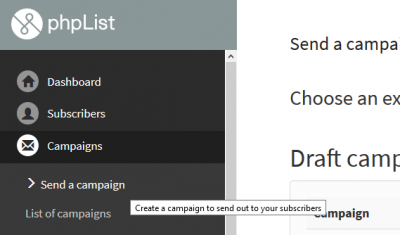
Apart from the dashboard approach, you can also access the “send a campaign” option by selecting Campaigns > Send a Campaign from the Campaign Menu Dropdown within the phpList title bar.
Select send a campaign to be taken to the “Send a campaign” page. This action shows the current draft campaigns, their respective ages, and their statuses in a section called the ‘Draft campaigns’ portlet. As the administrator, you can either access a previously saved campaign to continue it through to completion, or you can begin a new campaign by selecting the Start a new campaign.
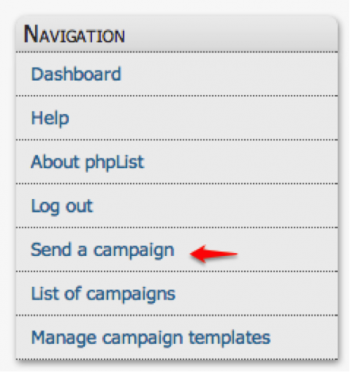
Finally, you can execute a new campaign by selecting the Send a Campaign option in the ‘Navigation’ portlet. This option, however, is only available when the administrator is working on a related process, as the ‘Navigation’ portlet shows related processes to the one you are currently working.
Sending a New Campaign
Regardless of the route you choose to access a new campaign, the process for creating a new campaign is consistent. All campaigns begin by selecting some form of the Start a new campaign icon.
The template and steps for sending a campaign may vary slightly depending on your level of administrator access, but the general workflow is as follows.
Content
The Content portion of the send a campaign process requires a variety of fields be filled: Subject, From Line, Content, Compose Message, and Footer. Within the content portion, you are actually creating your message and providing the system with critical details about your message. Some of the more relevant fields are:
- Subject: The Subject is the Title of a Campaign. It will appear as the title of the email to subscribers that have subscribed to a campaign.
- Content: The content section refers to the sending method. The options include “send as a webpage” and “compose message.” For more information on the options, and the difference between “send as a webpage” and “compose message,” select the
 information/help icon. More information on “send as a webpage” is displayed below.
 - Footer: If a specific template and default footer was not created during the original configuration process, a system-generated footer will appear for each campaign. You have the ability to change this footer. The system-generated footer will change depending on the action taken by the subscriber. For example, if a subscriber forwards an email to a non-subscriber, the footer will change allowing the new recipient to subscribe for emails in the future. For more information on the footer, its options, and how to set a new default footer, select the
 information/help icon.
Note: At any point during the send a campaign process, the administrator can save the campaign as a draft and return at another time, or send a test campaign to an email of their choosing.
Sending as a Webpage
When sending as a webpage, you must specify the URL of the webpage you want to send. The system will then fetch the URL, and send it to your subscribers. Images will live on the website you send. When clicktracking is enabled, all links from the website you specified will be rewritten to go via phpList. Therefore, anytime a subscriber clicks on a link within the message, statistics will be gathered and rendered for the administrator to analyse on the “URL Statistics” page.
Note: this feature does not work for image maps. For more details on sending as a webpage, see the section on URL statistics.
To proceed through the send a campaign process, select Next.
Format
The Format portion permits you as the administrator to choose between an html campaign and a text campaign. If you select html, an html version will be sent to subscribers provided that they selected html in their subscription preferences. If they had not selected html, the subscriber will receive the campaign email in text format.
Additionally, you have the option of verifying which template you would like to use during this step. Select the appropriate template from the ‘Use Template’ dropdown. If you use a template, the message will be placed in the location of the [CONTENT] placeholder in the template. [FOOTER] and [SIGNATURE] placeholders can be added, but they are optional.
Select Next to proceed through the process, or Back to edit a prior portion within the process.
Scheduling
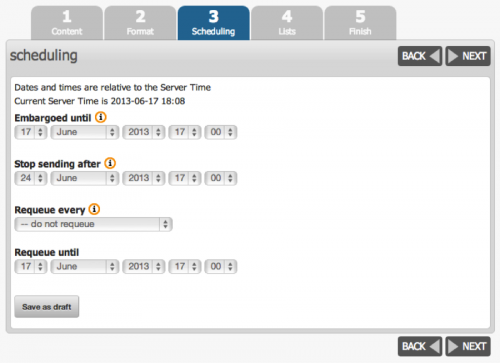
Modifying the scheduling portion of the sending a campaign process allows you to determine the specifics around when your campaigns are sent. Note that the numbers in the process may change depending on an administrators’ access level. That is, scheduling will not always be step 3, as indicated in the image below. Some of the fields include:
- Embargoed Until: This step lets you select a time when the messages will begin to be sent. If no date is selected, the default embargo is 0:00, which means that the emails will be sent immediately. Note that the ‘embargoed until’ field does not indicate what time the messages will be received by the subscriber, only what time they will begin to be sent by the administrator. For more information, select the
 information/help icon.
 - Stop sending after: This value insures that messages will not be sent after a set time. It is useful for messages that pertain to future events, as it will prevent subscribers from receiving messages about said event, after the event has already occurred. For more information, select the
 information/help icon.
 - Requeue every / Requeue until: The requeue fields place a campaign back in queue after the initial sending is finished. This option might be used to reach subscribers that may have signed up after the initial campaign was sent. For more information, select the
 information/help icon. By using the requeue option, the embargo of the campaign will be set to the time plus the requeue frequency specified.
Lists
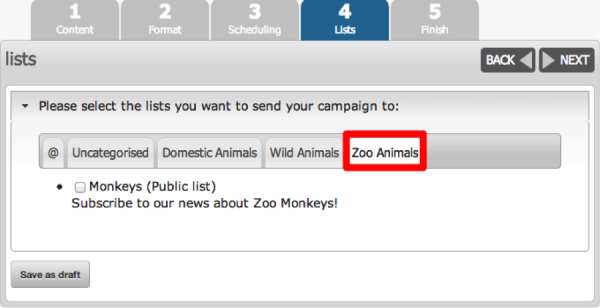
The lists step in the process requires the administrator to select the distribution lists to which the campaign messages will be sent. If no distribution list is selected, the system will warn the administrator that a campaign cannot be sent without a distribution list. This step includes a list of the available distribution lists given an administrator’s security permissions, as well as a brief description of the list, and whether or not the list is public or private. If the lists have been grouped into categories, the categories will show was tabs within the ‘lists’ portlet.
Finish
Finish is the final step in the send campaign process. If prior steps were not completed correctly, the system will notify you what fields are missing. 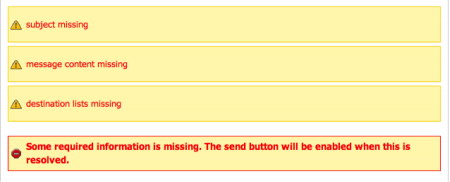
Additionally, this step permits an administrator to designate someone, usually another administrator, to be notified when message sending commences. Furthermore, the administrator can choose someone to be notified when the campaign has finished. More than one email address can be added for these notifications, provided that the email addresses are separated by commas. From the “Campaign started” email, the person or administrator designated to be notified can track the status of the campaign via a link in the footer of the email.
- Add Google Analytics Tracking Code: This feature embeds tracking code in the emails, and is a way of providing more information about the success of a campaign to the administrator.
- Reset Click Statistics: Selecting this action clears existing click and open statistics for this campaign. For example, if you have been sending test messages and have clicked the links, the database might have some statistics that you will want to clear before formally sending the campaign message to your subscribers.
Note: Make sure not to select this once your main campaign has started or else you risk clearing statistics from real subscribers.
Select Send Campaign to begin sending messages to subscribers.


After a campaign is sent, the administrator is brought to a confirmation page, saying the campaign has been added and has been queued. Select Process Queue to initiate the sending of the campaign, as this is a separate process required to send the messages.
After Process Queue is selected, scripts will run, and information will be provided regarding the success or failure of the sent messages. When the queue is done being processed, the system will indicate this by showing an “All Done” message in the ‘Processing Queued Campaigns’ portlet.
Process the Queue
Clicking on 'process queue,' after a campaign has been added and queued, will send all queued messages, provided they are not under embargo (Scheduled to be sent later on). Once you have clicked on process queue, the sending process cannot be cancelled. If you do not process the message queue, messages will remain in the queue. The idea behind the queue capability of the system is that an admin can prepare messages for sending, and then have them actually sent by a scheduler or cron job.
Note: When processing of the queue has started you should leave the browser window open till the result is displayed. Depending on the load of messages to be processed, processing the queue can take from a few minutes up to an hour or more. If even the system seems unresponsive when processing within a browser, the process is occurring.
PhpList will not send any message to people who have not confirmed their subscription. If you are sending more than 1000 messages, it is recommended you use command line queue processing. Processing the queue within the browser when there are more than 1000 messages being sent will significantly slow your system. After the queue is processed and the message campaigns are sent, A confirmation report will be sent to the email address(es) entered on the “configuration page” in the ‘Who gets the reports’ field. Additionally, as mentioned above, you can also be alerted by email when the message sending starts and ends, by entering one or more email addresses on the ‘finish tab’ during the Send a message process.
- Message sending speed and batch processing - To help avoid server overloads you can configure phpList to slow down the rate at which it feeds messages to the mail server, by using 'mail queue throttle' setting in config.php. If you are on a shared hosting service, it is likely you will face limits in the number of emails you may send per hour or per day. By using the 'mail queue batch size' and 'batch period' settings in config.php, you will be able to keep the number of sent messages within these limits.
- Alternatives to processing the queue manually - Instead of processing the queue manually through your web browser, you can use a cron job, a commandline script, or both. If you have more than 1000 users, it is recommended to use commandline queue processing. There are several reasons you might prefer processing the message queue with a cron job and/or commandline script. For instance: It will reduce the problem of timeouts, and -if your server is running PHP-cgi- you'll avoid having to leave the browser window open for hours.
- Command line script - An alternative to using your web browser for queue processing is a commandline script, which you can execute on a scheduled time by using a cron job. A sample commandline script is included in the phpList distribution. To be able to use a command line script, the command line version of PHP (PHP-cli) must be installed on your server. Please read the three interfaces of PHP for a brief discussion of differences between PHP-cli and PHP-cgi. A second (obvious) requirement is that you must have access to the command line itself (shell access). Note that when you use the command line script, you will not need to select process the queue after you select send the campaign. (The command line process will happen right away.)
- Cron job - A cron job is a scheduler for unix/linux operating systems that will execute commands on a predefined time. While you can use a cron job to execute commands embedded in a commandline script, you can also place the commands directly in the crontab file. The latter method is useful when your server is running PHP-cgi instead of PHP-cli.
Note: Keep in mind that whatever queue processing method you use, you still need to put the messages to be sent in the queue.


