meta data for this page
Importing Emails using 3 Different Input Methods
From the “Add some subscribers” page, you (the Admin) can complete the Configuration process, or add additional subscribers anytime you see fit. The “Add some subscribers” page offers the administrator 3 import choices: Copy and paste a list of emails (addresses), import by uploading a file with emails (addresses), and import by uploading a CSV file with emails (addresses) and additional data.
The “Add some Subscribers” page can be accessed by:
- In the title bar, select Subscribers>Import Emails
- In the title bar, select Config>Configuration>Add some subscribers
- In the title bar, select Subscribers>Manage Subscribers>Import subscribers
- Select Import Subscribers in the ‘List and User Functions’ section within the Dashboard.
Copy and Paste a List of Emails
Directions / Steps
- Select the Copy and paste list of emails link to use a copied and pasted list of email addresses.
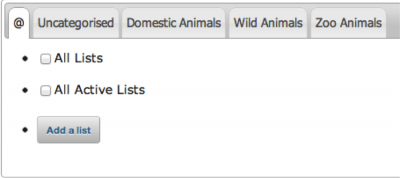
- The default lists to choose from are:
- All Lists
- All Active Lists
- Add a List
- Uncategorized
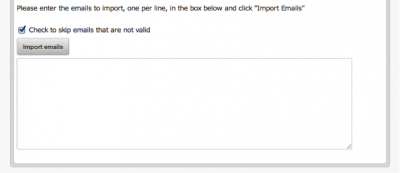
- To add email addresses manually, enter the email addresses to import, one per line, in the box below, and click Import Emails. Make certain to place a checkbox in one of the corresponding lists mentioned above so the system knows where to add the new emails addresses.
- After the emails addresses are imported, the administrator will receive a report with information on the number of new email addresses added, and how many of these addresses were valid. If setup properly in the configuration process, the system will email you (or another designated person) the results of the import.
- At least three emails addresses need to be added before the “Add some subscribers” step is completed in the configuration process. If that step had previously been completed, any amount of emails addresses can be added at any time.
Import by uploading a file with emails
Directions / Steps
- Select Import by uploading a file with emails. The Admin will be taken to the “Import Subscribers from Text File” Page.
- Predetermine the lists where the data from the soon to be uploaded text file will be stored.
- Note: The file you upload will need to contain the email addresses you want to add to these lists. Anything after the email address will be added as attribute “Info” of the Subscriber. You can specify the rest of the attributes of these subscribers below. The file needs to be plain text. Do not upload binary files like Microsoft Word Documents.
- Add the file by selecting Choose File, and browse for it on your local machine.
- Test Output - If you check Test Output, you will get the list of parsed email addresses on screen, and the database will not be filled with the information. This is useful to find out whether the format of your file is correct. It will only show the first 50 records.
- Check the appropriate box if you prefer to receive emails in HTML format.
- Select the appropriate values from the existing attributes, and select Import.
- The following page will provide the results of the test import. If the results appear correct, and there is one email address per line, select Back and uncheck the Test Output checkbox. Next, select Import to officially import the text file. Note that this process is different from the import email addresses using a CSV file. It is important to remember that the Test Output checkbox must be unchecked to proceed with the official import.
Import by uploading a CSV file with emails and additional data
A CSV file is a “Comma (or character) Separated Value” delimited data file format with the usual extension of .csv or .txt. A CSV file stores tabular data in plain text form, and it corresponds to a single relation in a relational database. When imported, phpList will examine CSV files an input the appropriate data into preselected lists.
While an email address is the minimum required field for importing a subscriber account into a subscriber list, you may choose to include other subscriber data as well, like first name, last name, address, etc. There are several structural requirements your import file should meet:
- Make sure all the field names (headers) are in top row (first line) of the list.
- The field name for the column containing the email addresses must be 'Email'.
- Other field names must be exactly the same as the names of the subscriber attributes you created in phpList. However, if you haven't yet created any subscriber attributes in phpList, you may choose to let phpList create these automatically. In the latter case, the attribute names will be based on the field names of the import file.
- If you are using Microsoft Excel, be certain to save your file with the .CSV extension.
- If some of the fields (like subscriber names) contain non-ASCII characters like accented letters or umlauts, please make sure to save the file using the UTF-8 encoding. If you cannot save it directly in that encoding, you may reencode the file with Unix
iconvor Windows Notepad (some hints here).
Direction / Steps
- To begin the import of a CSV file, select the option titled Import by uploading a csv file with emails and additional data. This action will bring you to the “Import Subscribers from CSV File” page.
- Attach a file within the phpList system. The maximum size of a total data sent to the server can be 300M, while the maximum size of each individual file can be no larger than 100M. PhpList will not process files larger than 5MB. If you need to import a larger file, it is recommended that you split it up into smaller parts.
- Add the file by selecting Choose File, and browse for it on your local machine.
- It is important to note a variety of points before importing the CSV file.
- The file to be uploaded will need to have the attributes of the records on the first line. The email address column must be called “email” and not something like “e-mail” or “Email Address”. Case is not important.
- If there is a “Foreign Key” column, this will be used for synchronisation between an external database and the phpList database. The foreign key will take precedence when matching an existing subscriber, but it will slow down the import process.
- If used, it is allowed to have records without email address, but an “Invalid Email” will be created instead. The admin can then perform a search on “invalid email” to find those records. Maximum size of a foreign key is 100. Warning: the file needs to be plain text. Do not upload binary files like a Word Document.
- The admin has additional considerations to make before importing the CSV file, and these are outlined on the “Import subscribers from CSV file page.”
- File Delimiter - The admin must first choose a file delimiter, for which the default in PhpList is “Tab.” If unknown, open the file in any text editor and look for the character that separates each value. Common delimiters are semicolons (;), pipes (|) and tabs (\). Despite the name, CSV files rarely use commas since they're so common in normal text. Enter the delimiter in the field provided.
- Test Output - If you check Test Output, you will get the list of parsed emails on screen, and the database will not be filled with the information. This is useful to find out whether the format of your file is correct. It will only show the first 50 records.
- Show Warnings - If you check Show Warnings, you will get warnings for invalid records. Warnings will only be shown if you check Test Output. They will be ignored when actually importing.
- Omit Invalid – If you check Omit Invalid, invalid records will not be added. Invalid records are records without an email address. Any other attributes will be added automatically, i.e. if the country of a record is not found, it will be added to the list of countries.
- Assign Invalid - Assign Invalid will be used to create an email address for subscribers with an invalid email address. You can use values between [ and ] to make up a value for the email address. For example if your import file contains a column “First Name” and one called “Last Name”, you can use “[first name] [last name]” to construct a new value for the email address for this subscriber containing their first name and last name. The value [number] can be used to insert the sequence number for importing.
- Overwrite Existing - If you check Overwrite Existing, information about a subscriber in the database will be replaced by the imported information. Subscribers are matched by email address or foreign key.
- Retain Old Emails - If you check Retain Old Emails, a conflict of two email addresses being the same will keep the old one and add “duplicate” to the new one. If you don’t check it, the old one will get “duplicate” and the new one will take precedence.
- After proceeding through the aforementioned steps, select Import.
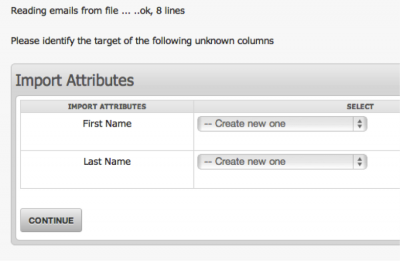
- In the instance above, the CSV file contained three columns: Email, First Name, and Last Name. Before the System automatically imported all valid email addresses, it prompted the admin to identify the two unknown columns. As an admin, select the Create new one dropdown to tell the system how to handle the unrecognized CSV columns. The system can be told to perform a variety of actions on the columns, including Create new One (Attribute) and Skip Column.
- The rest of the options on the page are well explained, but for the most part you can just check all the boxes. Imported subscribers are marked 'Confirmed' by default. The next several steps assume that you checked 'test output'.
- Click the 'Import' button.
- Warning - If you need to restart the import process after you click the 'Import' button, you cannot simply click the 'back' button on your browser and start over. PhpList is holding the imported data in memory and is likely to jumble the current data with re-imported data. To restart the import process, you must click the 'reset import session' link available on all subsequent pages.
- The next step in the import process is phpList's attempt to match the data fields in the CSV file with known attributes (such as Name, City, etc.). If it successfully matches all the fields, you will either see a page saying everything matched up correctly, skip this step entirely. However, if the field names do not match PhpList's attribute names, you will be asked to match them up yourself. For each unmatched name a row will be displayed with that name on the left and a drop down menu on the right. Select the drop down option that matches the field name (for instance, the field name 'First_Name' was probably intended to match the PhpList attribute 'FirstName' so you would select that option from the drop down menu). If the field name does not match any of the attributes (perhaps it is a superfluous field accidentally included in the CSV file), you can choose '–skip column' from the drop down menu and it will not be imported. Similarly, if you have a field that you want to include but is not a current PhpList attribute, you can select '–create a new one' and a new attribute will be created for that field in PhpList.
- Once you have selected options for any unmatched field names, click the Continue link on the bottom of the page.
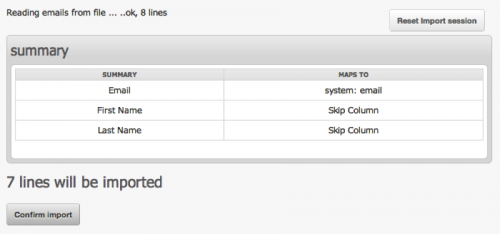
- Assuming you checked the 'test output' option earlier, you will see a page that shows how the CSV data will be imported, next. Presently, nothing has actually been imported into PhpList. Under the heading 'Test Output' you will see groups of attribute names pointing to sample data. Verify that the data matches the attribute (the attribute 'Date' should not point to 'Coco Puffs').
- Once you are sure that PhpList is going to read your CSV file correctly, click the link reading 'confirm import'.
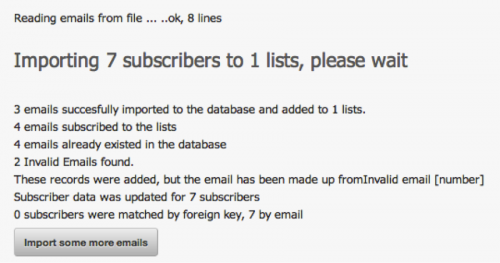
- The next page provides statistics on how the status of the upload. It will tell you how many emails were imported to the database (note that this may be less than the number of rows in your CSV file if the file contains email addresses that already exist within the database since phpList will not import the same email address twice). This is the end of the import process. If you want to upload another file, there is a link at the bottom, import some more emails, that will take you back to the beginning of the process.


