Table of Contents
Subscriber Dropdown Functionality
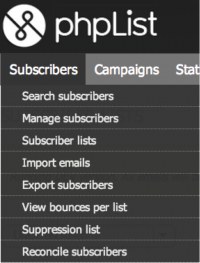
The subscriber dropdown is another one of the seven options to choose from in the phpList title bar. Within the dropdown, an Admin can search subscribers, manage subscribers, access subscriber lists, import emails, export subscribers, view bounces lists, access suppression lists, and reconcile subscribers.
To access subscriber functionality; browse the subscriber dropdown within the phpList title bar.
Search Subscribers
“Search subscribers” permits an administrator to take both a high level look of subscriber details, as well as a more precise glance at specific subscriber details. At a high level, the administrator is given information on the number of subscribed, and those that are unconfirmed – meaning, those that may have subscribed, but have not yet authenticated their subscription.
At a more detailed level, Admins have the ability to Find Subscribers, and sort them by a variety of properties. You can choose to search and display only unconfirmed or blacklisted subscribers by marking the corresponding checkbox. You can also sort by properties including email, bounce count, entered, modified, and foreign key, and display these results in ascending or descending order. Furthermore, you can search out individual subscriber details by browsing by email address, foreign key, or any attributes.
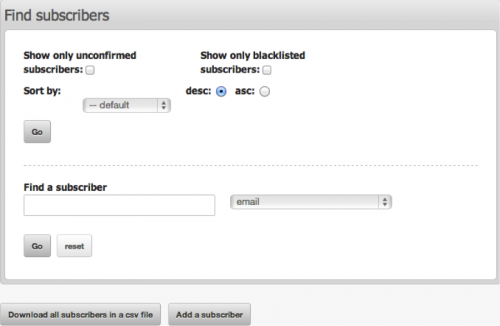
After the fields are chosen, select Go to process the results. The results will be displayed within the same page, as shown below, but they can also be downloaded in a CSV file as indicated in the screenshot above. In the instance below, only unconfirmed subscribers were searched, and this information was sorted by: default. The emails have been blurred out in this image. 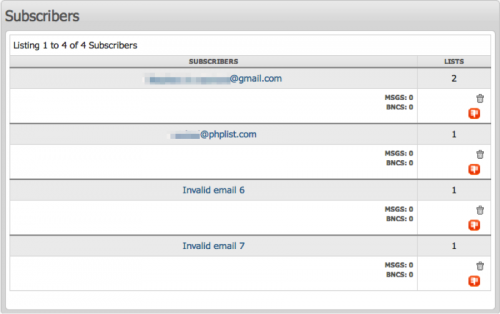
The displayed details indicate that four subscribers have yet to confirm their subscription. Additionally, this data shows the number of lists that each subscriber is subscribed, the number of messages an individual subscriber received (MSGS), and the number of bounces that occurred (BNCS). The ![]() icon indicates that the subscriber has not yet confirmed their subscription, and is thus, unsubscribed. The
icon indicates that the subscriber has not yet confirmed their subscription, and is thus, unsubscribed. The ![]() icon permits the admin to manually delete the record in the system.
icon permits the admin to manually delete the record in the system.
More data is available by selecting a subscriber’s email address. This action will take the admin to the “Details of a subscriber” page.
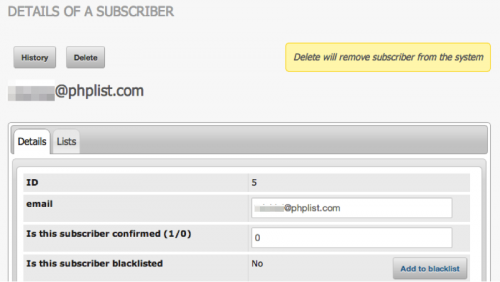
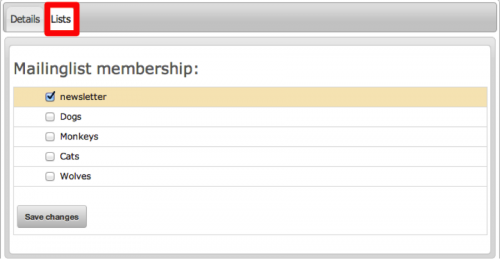
The Admin is presented with a details page, and has the option to view more information on the lists page, which shows the specific lists that the subscriber is subscribed to, or select history, which shows the subscribers campaigns and subscriptions. The Lists view is displayed below.
Unlike the Lists view, the Details view offers more information, and provides the Admin with functionality like adding a subscriber to the blacklist (by selecting Add to blacklist), changing their attributes, or manually overriding some of the subscribers preferences or details. 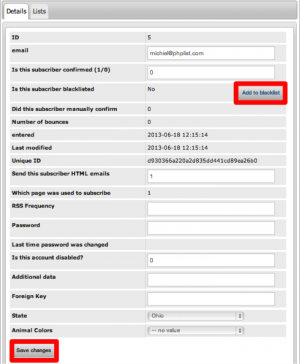
To download the subscribers in a CSV file, select Download all subscribers in a csv file within the “Subscribers Page.”

To add additional subscribers to a variety of lists, select Add a subscriber within the “Subscribers Page.” You will then be prompted to manually input an email address. If the email address already exists in the system, the subscriber details of that subscriber will be displayed to the administrator. 
Manage Subscribers
To manage subscribers, select the option in the subscriber’s dropdown menu. The manage subscribers page groups all of the Admin’s management functions on behalf of a subscriber in one place. Some of this functionality includes other topics that appear on the Subscriber dropdown.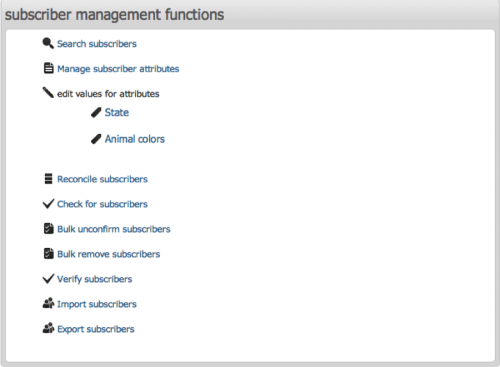
- Search Subscribers – This option redirects you to the “Search Subscribers” page, explained above. It also appears as an option under the Subscriber dropdown.
- Manage Subscriber Attributes – This option brings you to the “Configure Attributes” Page, which is initially setup during the configuration process. From this page, you may create, merge, or delete attributes, and change their values.
- Edit Values for Attributes – Instead of having to go through the “Configure Attributes” page, the edit values for attributes option brings you directly into each attribute, where you can edit values.
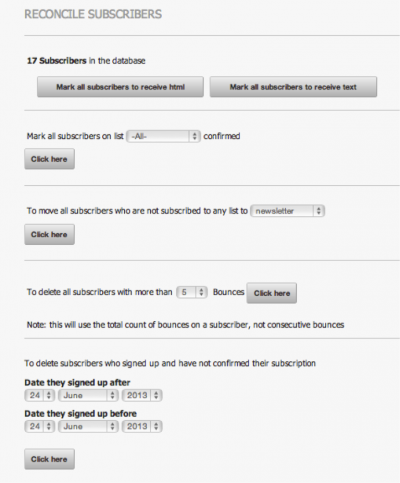
- Reconcile Subscribers – Provides you with administrative access over groups of subscribers. From this page, called the “Reconcile Subscribers” page, you can render all subscribers to receive HTML or Text versions of campaigns. You may also confirm subscribers on any and all lists, move to a new list those subscribers that are not subscribed to any list, and delete subscribers in a variety of ways. You can delete subscribers with more than “X” number of bounces, or delete subscribers that have not confirmed their subscription within “X” days of their original signup date.
- Suppression List – This page permits you to enter one or many email addresses, and temporarily unconfirm subscribers from all Lists. This is a temporary action, but can be rendered permanent if the Permanent option is selected. Permanently suppressing a subscriber is equivalent to adding the subscriber to the “Blacklist.”
- Bulk Remove Subscribers – This is a way to mass remove email addresses from the system. You can enter one or many emails to do this, and you also maintain the ability to blacklist these email addresses. Bulk remove permanently removes all traces of the subscriber from the system’s database.
- Verify Subscribers - A useful utility for you (or another administrator with appropriate permissions) to check if some subscriber exists based upon their email or foreign key.
- Import Subscribers – This action takes you to the “Import Emails” page, where the you can import subscribers based upon 3 methods: copy and paste emails, import by uploading a file with emails, or import by uploading a csv file with emails and additional details.
Subscriber Lists
For more information pertaining to subscriber lists, view the list and subscribers section of the configuration process document, here.
Import Emails
For more information on how to import emails, click here.
Export Subscribers
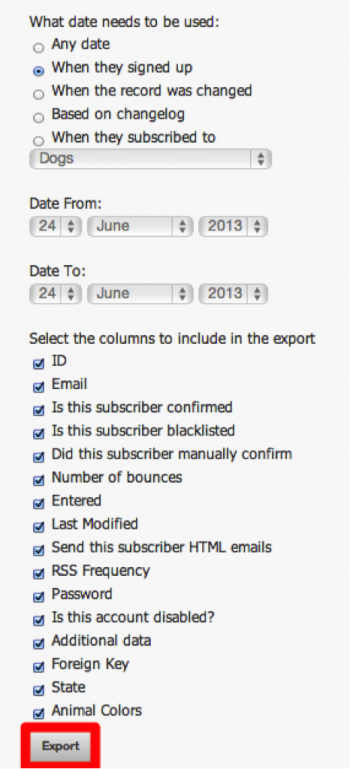
Exporting subscribers allows you to use the subscribers' data in any spreadsheet program. This can be useful when you wish to conduct a statistical survey on the subscribers within your database. Note that this requires specialized computing skills only available on dedicated programs, and phpList is not designed to do elaborate calculations or search queries and to present the result in an easy-to-use format. For more information, see the Export Subscribers Content Above.
View Bounces Per List
To view the bounces per list, navigate to View Bounces per List from the Subscriber Menu dropdown. This action will bring you to the “View Bounces Per List” page. This page features the ‘Choose a List’ portlet, which displays all lists in the system, as well as their associated number of bounces.
Bounces are campaign messages that are returned because they could not be delivered. This might happen for a number of reasons: The mailbox of the recipient might be full, the email address might no longer be valid or temporarily disabled, the email address might be misspelled, etc. A bounce is not the same as an out-of-office reply. 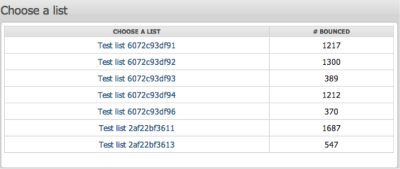
Select a specific list featured in the ‘Choose a List’ portlet. In the snapshot above, selecting Test list 6072c93df91, brings you to the following page.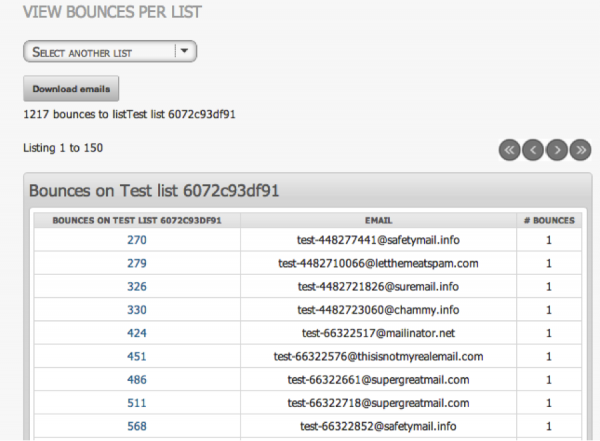
As apparent in the screenshot above, the more granular bounces page provides information on a subscriber’s email address, the number of bounces that occurred for a specific subscriber, and the Unique ID of the subscriber that received the bounce. By selecting the Unique ID above (270), you can access the “Details of a Subscriber” page.
By selecting Download Emails, you can retrieve a list of all the subscriber emails that bounced. This data will be provided in a TXT file.
Suppression List
For more detailed information on a suppression list, refer to the section above titled Manage Subscribers.
Reconcile Subscribers
The Reconcile subscriber’s page provides several options to maintain the subscriber lists. These include: delete all subscribers not subscribed to any list, find subscribers with an invalid email, delete subscribers with an invalid email, mark all subscribers to receive html, etc. For more information, see the Reconcile Content Subscribers information above.
